Scar of the Abyss is a Location in Immortal Unchained. Scar of the Abyss is the first location on Arden (the ice planet) that you will encounter.

General Information
- Previous: The Core, Grand Hall
- Next: Tribunal of Souls
- Recommended Levels: 3 and up
- Bosses: None
Video Walkthrough
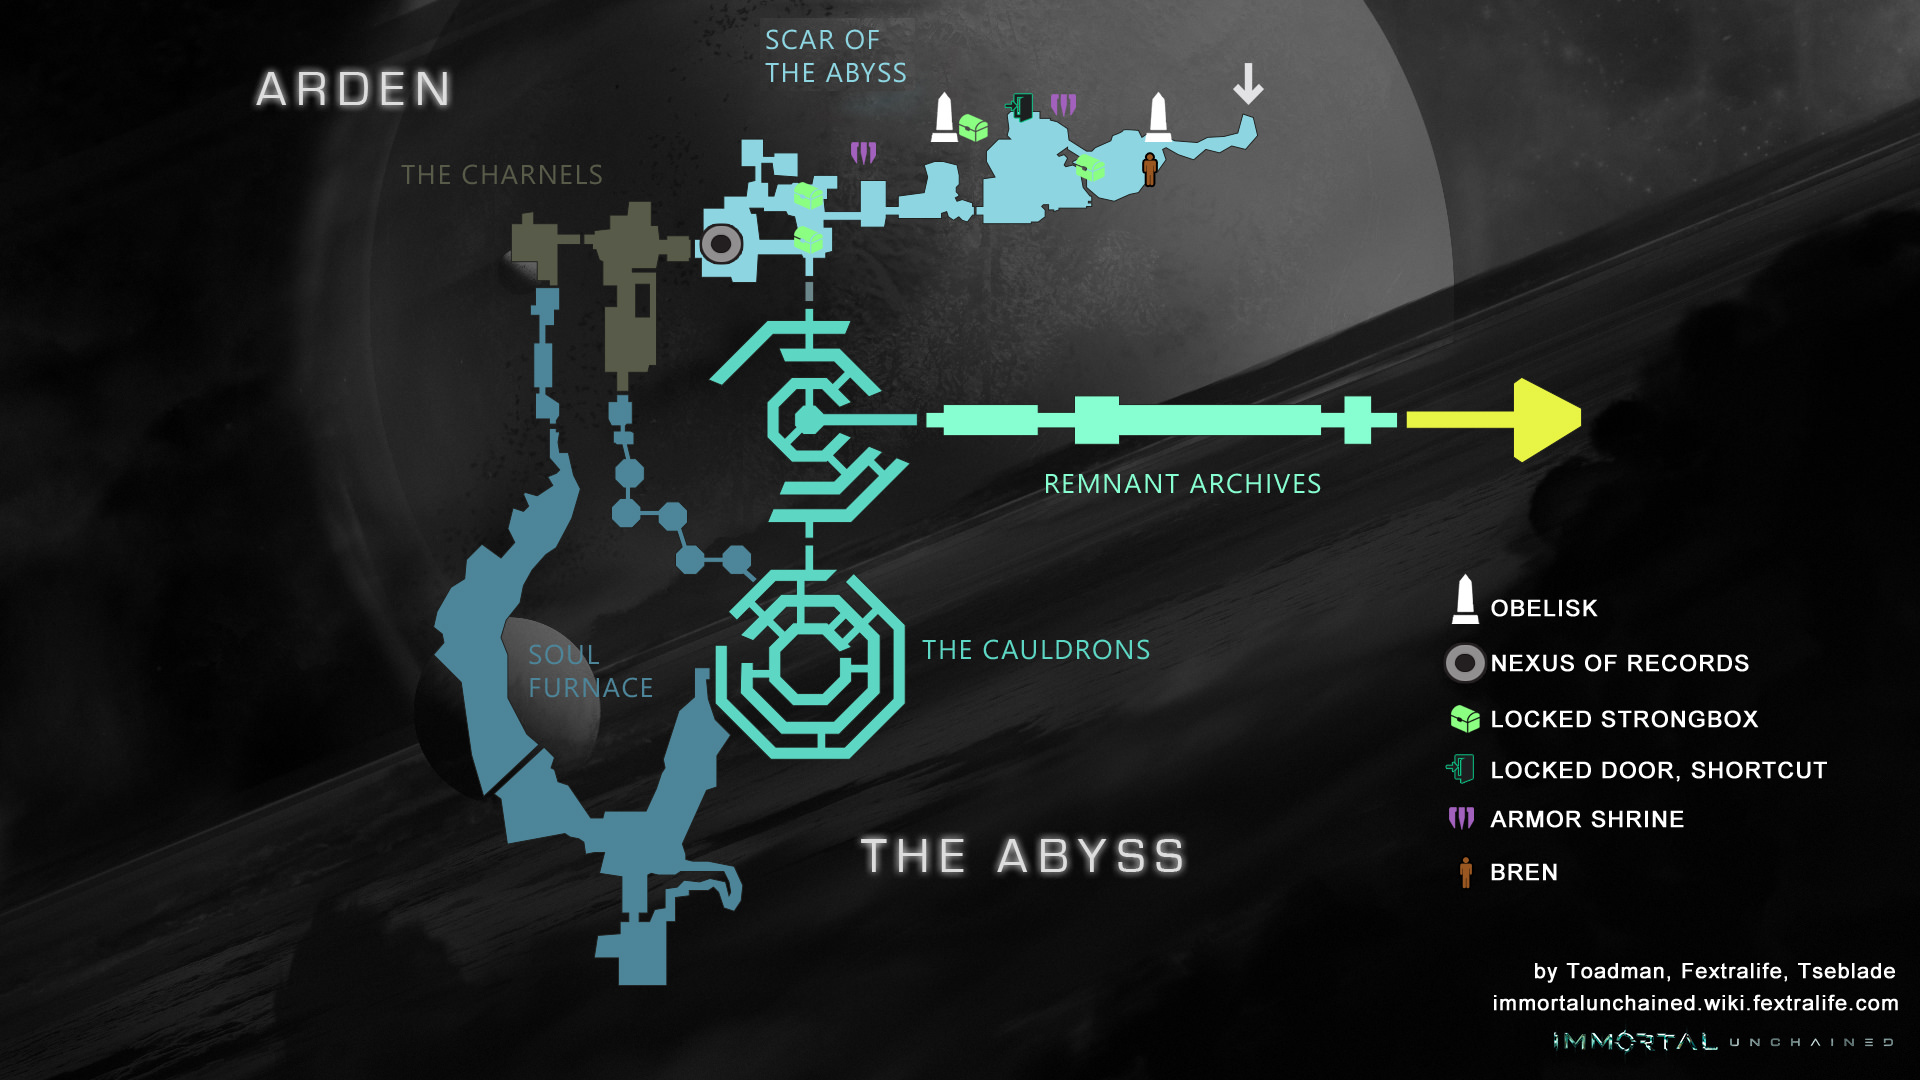
Scar of the Abyss Map
NPCs in the area
Bosses
- None
Items
Consumables
- 4x Small Energy Potion
- 3x Bit Capsule, Small
- 5x Basic Component
- 1x Energy Patch
- 1x Armor Dye: Dark Blue
- 2x Heat Patch
- 2x Acid Patch
- 1x Bit Canister, Large
- 1x Small Ammo Pack
- 1x TRM Syringe
Weapons & Equipment
- Legion Sidearm
- Rogue Inciter
- Legion Holmeguard Shotgun
- Portable Relay
- Adamant Protocol
- Jaded Carbine
- Defense Cypher
Others
Enemies
- ??
Full Scar of the Abyss Walkthrough
Icy
Upon exiting the portal, you'll arrive at a blizzard-struck hill, and will find a Basic Enemy immediately on your right. Continue in this direction to find a point of interest, "use item" to learn a bit of the realm you are currently on. If you continue forward, you'll come across a split; the road on the right continues upwards, and the other on the left continues straight to a ladder. This ladder brings you down to a Strongbox containing 1x Small Energy Potion, and 1x Bit Capsule, Small. Head back up, and up the path on the right. You will encounter your first Obelisk of the level shortly after.
From the Obelisk, check left for a Small Strongbox containing 1x Small Energy Potion. Next to it you'll find the NPC, Bren, which talking to will give you a bleak exposition of the area. Continue forward to come across a slope heading down, and find a Basic Enemy. At the bottom of the slope, you'll find a split:
- Head left and descend down the first ramp, and you'll find a Small Strongbox containing a Legion Sidearm. You'll also find an Ancient Shard at the end of the very short path. Use it for some more lore, and head to the right.
- Heading right, pick up the 200 FB drop before heading down. You'll also immediately find a (Large) Strongbox, however this one requires 10x Cerium Decree to open, and must be ignored for now.
Continue forward to find another Basic Enemy on the bridge ahead. Kill him and pick up another 200 FB just before the bridge. Head right to find another Basic Enemy and another 200 FB atop a ramp -that's all there is up here! In the drain water below, two more of the same enemies will emerge. Head forward, and soon you'll arrive at a set of stairs, a 300 FB drop, and a sticky situation. Here you'll find a total of 4 enemies, and a Shield that cannot be penetrated (confirm?). On the right, before heading up the stairs, you'll find a small waterfall that hides a Forlorn Idol. Up the stairs on the right, you'll find a Small Strongbox containing 1x Basic Component. Once you've acquired it, head back the other way. On the left of the stairs, you'll find another split:
- Head straight past the stairs, and you'll arrive at a dead end where you can drop the ladder to open up a shortcut back to where you saw enemy on the bridge, just before the drain water area.
- Head across the thin path on the left and use the Ancient Shard right before the next thin walkway, to obtain the Icy Pebble. Continue to the other side, making note of the enemy above and the trap right at the end of the walkway. You'll arrive at another set of stairs where you can pick up 1x Energy Patch. Up the stairs, take a right this time to find an Armor Shrine that gives you Armor Plating 1. Head back and left to pick up 300 FB and find a small gap in the rocks to close the space between the enemy shooting you from above. Where he was, you'll find a Memorial. Head back to the stairs and continue straight through the door, and to the ladder. Take the ladder down and you'll arrive at an Obelisk, and a Large Strongbox that requires you to have 1x Promethium Edict to open.
- When you turn the corner, head up the stairs and continue on the path. You'll come across an entrance on your left, while following the path leads to a bridge -take the doorway. Continue along the hallways until you find a small alcove holding a Strongbox containing a Rogue Inciter, and 1x Armor Dye: Dark Blue. Continue in the same direction to emerge at a doorway that leads back outside to three enemies and a couple shields.
Head left from the door to find a Strongbox containing Cloud Dancer's Enforcers, and 1x Small Energy Potion. Explore this area to find 1x Acid Patch in a Small Strongbox next to a waterfall that hides a Forlorn Idol. Look for a ladder next to a small waterfall here to progress. This brings you up to a ledge where you will be immediately attacked by an Enemy on the left. Head right and collect the FB drop, then fight off the two enemies on the bridge. Cross it all the way to loot a Small Strongbox for a Cerium Decree and 1x Small Energy Potion. Cross back over the bridge and take the new ladder on the right. This brings you down to a large doorway. Take it down to the indoors. Continue down the stairs and you'll find a lever that you should be able to access at this point. This shows a cutscene of a bridge being extended below your feet, out to the Obelisk from earlier. Pick up the 200 FB and head down the stairs.
Past the Second Obelisk
First thing's first, claim the 1x Heat Patch from the Small Strongbox, then continue forward. You'll have to face two enemies shortly after in a small corridor. When you come out the doorway, there will be an enemy. Head right to find an enemy guarding a Strongbox containing 1x Heat Patch, and 1x Bit Capsule, Small -be careful not to get caught in the trap here. Head back and continue to the 200 FB drop, then carefully drop down to the lower area ahead. There is a clear path to take that has been submerged with water; follow the path into the doorway. Continue along until you emerge back outside. You'll find another Forlorn Idol shortly after, and a Strongbox shortly after that containing a Legion Holmeguard Shotgun, 1x Acid Patch, 1x Portable Relay, and an Adamant Protocol. Continue along the main path and you'll arrive at a ladder.
Downstairs
Up the ladder, you'll arrive at a shield, and will have three enemies ready to fight you up the stairs, and another three down; defeat the ones above then proceed below -we'll come back the other way under "Upstairs". Head down the stairs, and you'll find a path to the left, take it -there is also a ladder you can kick down on the platform straight ahead. On this platform you'll be able to use another Ancient Shard, and fight another enemy behind a shield. There will also be another enemy that will be able to reach you from where he's positioned, on the right. Continue forward to take him out. You'll also find a set of steps that lead up to nothing but a 300 FB drop. Head down the stairs, and defeat the enemy on them. At the bottom of this set, you'll find another 300 FB drop. Continue along the path.
You will come across a shield facing a set of steps leading down, this is where an enemy will spawn. Down in this area, if you head right, you'll find an enemy guarding a Strongbox containing 1x Cold Patch, and 1x Basic Component. Head forward and you will also find an enemy, as well as a Strongbox containing a Jaded Carbine, a Cerium Decree, and 1x Basic Component, next to a shield. On the left of this, find a Small Strongbox containing 1x Basic Component, and 1x Bit Capsule, Small. To the right of this, you'll find a set of steps and another enemy.
IF YOU Continue forward and head down through the doorway on the other side, and follow it all the way through, you'll eventually return to the second Obelisk via the same way you left.
Upstairs
Remember how we chose to go down? Backtrack to the point you made this decision and go the other way. Up the stairs, and across the bridge, you'll find another Forlorn Idol directly left of the end of the bridge. Continue forward, hugging the left structure to find a Small Strongbox holding 1x Basic Component. There are stairs that we will ignore for now to head across the bridge on the right. Once off this bridge, you'll find an Armor Shrine that will grant you Elemental Resistance 2. Continue straight to find a lever, you should be able to activate, to open the door. This door brings you to the upstairs of the second Obelisk room, once again.
Backtrack to the stairs we ignored in the previous paragraph and take them up. You'll find a Large Strongbox containing a Defense Cypher, 1x Bit Canister, Large, 1x Small Ammo Pack, and 1x TRM Syringe. Up here you'll also find a dual glaives-wielding enemy. Across the next bridge, you'll encounter another two enemies, and a lever that requires a key. Continue forward, up the small steps, to enter the Tribunal of Souls.
Scar of the Abyss Video
Scar of the Abyss Map


