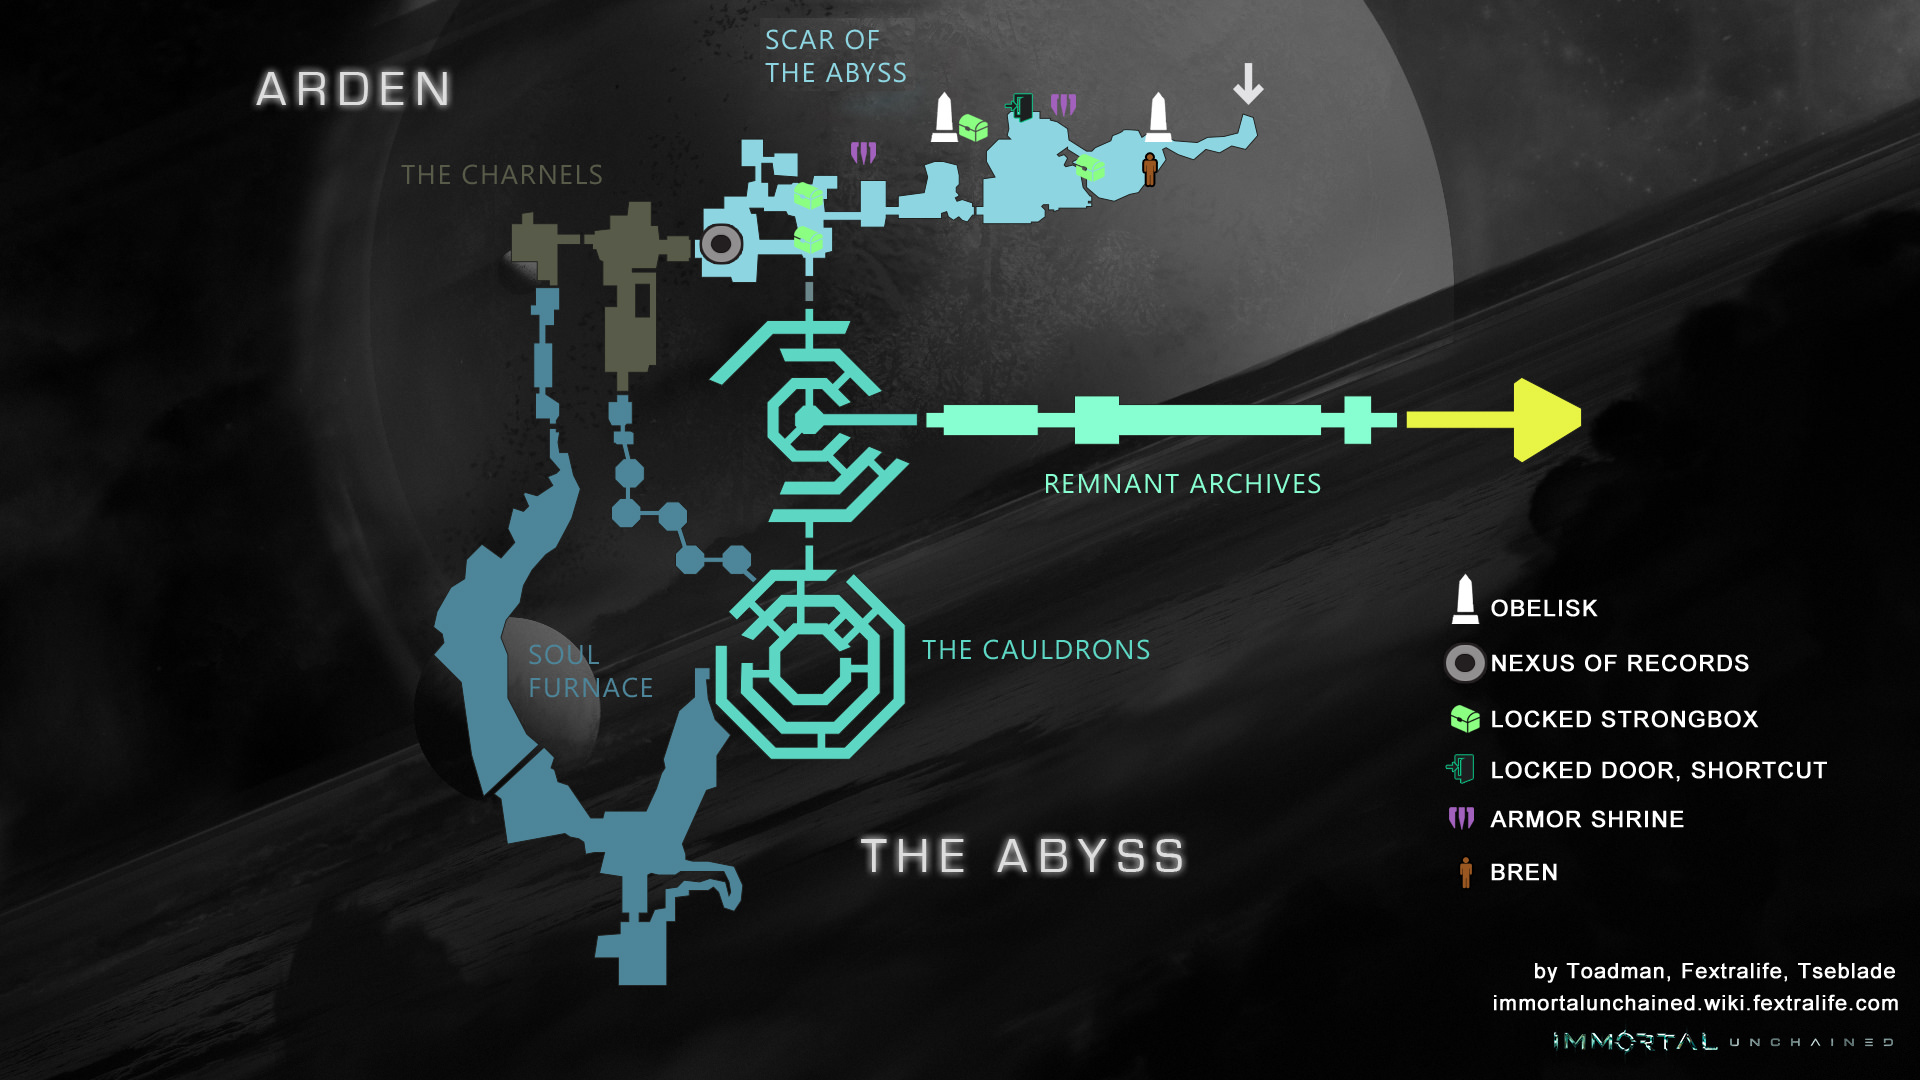
The Charnels is a Location in Immortal Unchained. Area description goes here.

General Information
- Previous: Sanctum of Fate via Tribunal of Souls
- Next: The Abyss
- Recommended Levels: Any
- Bosses: ??
Video Walkthrough
The Charnels Map

NPCs in the area
- None
Bosses
- None
Items
Consumables
- 2x Small Energy Potion
- 1x Bit Cistern, Small
- 2x Combined Patch
- 1x Energy Patch
- 1x Portable Relay
- 6x Basic Component
- 1x Armor Dye: White
- 2x Advanced Component
- 1x Bit Capsule, Large
- 2x Small Ammo Pack
- 1x Heat Patch
- 1x Updated Microprocesser
- 1x Cold Patch
Weapons, Spells & Armor
Keys & Other
Enemies
- Dual Drum Gun Enemy
- Dual Glaive Enemy
- Basic Enemy
Full The Charnels Walkthrough
Charnels
Entering from the Tribunal of Souls, you'll arrive in a corridor with glowing pods on each side. Follow this until you reach a door which opens into a room. On the right you'll find a door that can only be unlocked with a Promethium Edict, and Aria Protocol, and stairs ahead on the left. There's also a Small Strongbox containing 1x Small Energy Potion in between the two. At the base of the stairs there's a Point of Interest as well. Head up the stairs and proceed to the FB drop. Here you will also find a flying robot, which you can shoot down very easily. Continue on the path, and a Dual Drum Gun Enemy will emerge from one of the pods ahead. There will be a door here that brings you up to another door, into a room containing another Flying Robot and two Dual Drum Gun Enemies. After defeating the enemies, if you continue straight across the room from the entrance, you'll find a Large Strongbox that requires 14 Cerium Decree to open, containing the following:
If you hug the wall and continue walking, you'll find a Small Strongbox containing 1x Basic Component. Picking this up will trigger an ambush from the pod next to it, by another Dual Drum Gun Enemy. You can leave the room via the door on the left, with the FB drop next to it. Continue through the subsequent corridor and you'll find two doors ahead, that lead to an Obelisk.
Obelisk Onwards
Head back out the left door, and you'll find a staircase in the same corridor. This will take you up to a bridge where you will be attacked by a Dual Drum Gun Enemy ahead, as well as two more from behind. Across the bridge you'll enter another structure where you'll find a staircase on the left, and a door straight ahead. Another of the same enemy will attack from the door here too. Head up the stairs first and continue along until you come to a door. This brings you to a room with a Small Strongbox on the left containing an Offense Cypher. Head right and through the door to access the Armor Shrine for a Medical Attachment 2, and on the right of it is a Strongbox containing the following:
There is also a pod in the room with the Shrine that contains a Dual Drum Gun Enemy. Heading back -which is what you have to do- will trigger a few more Dual Drum Enemies to jump out of the pods in the subsequent rooms. Head back down the stairs and proceed through the door. Once again, in this room a couple of Dual Drum Gun Enemies emerge from the pods as well. Be sure to also pick up the FB drops here too, and a Small Strongbox containing 1x Bit Capsule, Large. Proceed to the door at the other side of the room, and pick up the Ancient Shard next to it. Head out, and a Basic Enemy will approach you.
Pick up the FB drop on the right, then head down the stairs. This will spawn a giant orb, much like the ones during the invasion of the Grand Hall, and a Giant Flamethrower Enemy and three Dual Drum Gun Enemies will emerge from it. Once they've all been defeated, look for the Strongbox by the stairs that contains a Separatist's Carbine, 1x Combined Patch, and 1x Basic Component. Head up the stairs and search the right side of the room for a Small Strongbox containing 1x Small Ammo Pack. There will be a door in the middle that requires 10 Cerium Decree, 1 Adamant Protocol, 1 Gemini Protocol, and 1 Scarab Protocol, the latter being the one you haven't collected yet, so head out the smaller door on the left.
No Scarab, No Party
Heading through the door, follow the corridor until you can take the first right turn, and continue this way. This upcoming area is riddled with Dual Drum Gun Enemies that pop out of a few of the pods, so keep a look out. Continue along this path, and take the stairs on the right to arrive at a room with a Memorial, a Strongbox containing 1x Basic Component and 1x Heat Patch, and two Dual Drum Gun Enemies. Head back out and continue onwards.
You'll arrive at another room with a couple of enemies, and a Small Strongbox containing 1x Small Ammo Pack. Head through the door on the right and follow the path until you reach a bridge. Across the bridge you will enter another corridor that leads to a door. Through the door you will find the second Obelisk, and next to it, an Ancient Shard.
Beyond Obelisk II
Head through the exit door to find a staircase. Proceed up the steps and you'll arrive at a split. Head right to reach a corridor. Here, one of the pods will release a Dual Glaive Enemy, and will also have a Sniper Enemy at the back. Follow this path around, ignoring the first right turn you see. You'll arrive at a door with stairs leading down, into a red-lit room. At the break, there's a path on the right, take it to the door. Through here you'll find a Strongbox containing an Imperial Grenade Launcher, and 1x Updated Microprocesser. Head back out to the room with the red light. If you proceed down the stairs, you'll find a ladder that you can drop down but can't climb down yet, as it is completely set ablaze. Wait for the fire to extinguish then climb down.
Path to the Abyss
At the bottom, there's a split (face the ladder):
Right
A door as well. This brings you to a a platform where you will be attacked by Dual Glaive Enemies. There is also a Small Strongbox here containing the Promethium Edict, which is required for access. Proceed up the stairs and you'll encounter a load of Dual Drum Gun Enemies, and a couple FB drops along the way. At the top of the steps, you'll arrive at a corridor which continuing through, will bring you back to the door to the previous Obelisk.
Left
A door to open. In this room there will be a few Dual Glaive Enemies and fire traps -these are activated by plates on the floor, be wary of them. Proceed through the door here to arrive at some stairs. Continue up until you find another door, then enter it as well. This will bring you to a room that has fire traps all over, including right after the entrance. From the entrance, turn right and U-turn up the stairs. This will bring you to a passage where Dual Drum Gun Enemies will still jump out of the pods and attack you, and you will find a Small Strongbox containing 1x Small Energy Potion. Follow the path to the end and you will re-enter the room you just left, with the fire traps. There will be a Memorial in the middle of the room, a Small Strongbox containing 1x Basic Component by the exit, and several pods here contain enemies. Once they've been dealt with, exit through the other door, which also has a fire trap.
You'll exit out to a platform with another FB drop, and stairs leading down. Take them all the way down, and you'll find a Small Strongbox containing 1x Cold Patch, and a door. Proceed through the door to arrive at another door that brings you outdoors. There will be an Ancient Shard to the left of the exit. Continue forward to find yourself in the Soul Furnace of The Abyss.
Doorway to Hell
Head up the stairs, and backtrack to the first turn that you ignored, right after the bridge. Head into this corridor and take another right. You'll find yourself in a room with a Memorial on the right, and a Small Strongbox with 1x Basic Component straight ahead. Head out of that room, and take a right once again. This brings you to a door that can only be unlocked with 12 Cerium Decree -which you should have at this point. Unlocking this door brings you to a room with a door/portal in the middle. Opening it uncovers it, revealing a fiery realm.
The Charnels Video
The Charnels Map

Trivia & Notes:
Trivia and notes go here

You missed a forlorn object with the strongbox alone in the room up from fire trap ladder.
0
+10
-1